

Tips and Tricks: Unity Spawn a Prefab
Introduction
Using Unity to spawn prefabs is a key component in developing games. Prefabs are composed of one or more GameObjects which have been turned into an object that can be copied, as is, for reuse throughout your scene. You can spawn an object at a position in the game world as an item, pickup, or puzzle piece. You could also spawn an object at a random position as an enemy or target.
To spawn a prefab, you will use Unity’s instantiate method which requires, at minimum, a reference to the prefab. It can also accept a transform to parent the object to, a position in the form of a Vector, or a Quaternion for the rotation of the object when it is spawned. In this Tips and Tricks: Unity Spawn Prefab we are going to show you how to spawn a prefab, spawn a prefab at a position, and spawn a prefab at random locations.
Unity How to Spawn a Prefab
First, to spawn a prefab we must create a script to handle the instantiation of our object. Create a Spawn Prefab script that contains three private fields. One for a GameObject, to hold a reference to our prefab. Another for a Vector2, to provide a position to spawn a prefab. Lastly, a boolean to change from a specific position to a random position. We also serialize these fields, so they are viewable in the Unity editor, by giving them the property [SerializeField]. For more on why we do this check out our article on Encapsulation.
Next, we will create a OnSpawnAPrefab method to control what happens when we want to spawn our objects. Inside of our method, create an if statement to check if our random boolean is set to true. If so, we will set the X to a random number between -8 and 8 and our Y to a random number between -4 and 4. We have chosen these numbers so that our objects will spawn within our camera’s view. We then spawn our prefab using Instantiate providing the GameObject we assigned, a new Vector2 created from our random X and Y, and a Quaternion.identity to zero out the rotation of our object when spawned.
Else, if our random boolean is false, we will instantiate the prefab with our specific Vector2 position and Quaternion.identity. We have placed the full script below. If you want to get a copy of this project including the full scene and assets we used for this demonstration, check out our Unity Tips and Tricks repo on GitHub.
using System.Collections;

using System.Collections.Generic;

using UnityEngine;

public class SpawnPrefab : MonoBehaviour

{

    [SerializeField] private GameObject prefab;

    [SerializeField] private Vector2 spawnPosition;

    [SerializeField] private bool random;

    public void OnSpawnAPrefab()

    {

        if(random)

        {

            float x = Random.Range(-8,8);

            float y = Random.Range(-4,4);

            Instantiate(prefab, new Vector2(x,y), Quaternion.identity);

        }

        else

        {

            Instantiate(prefab, spawnPosition, Quaternion.identity);

        }

    }

}
Spawn a Prefab Tutorial Scene
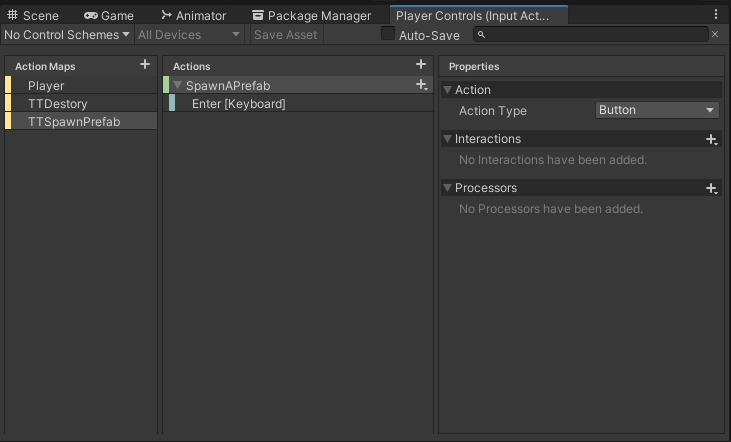
To control when our OnSpawnAPrefab method is called, we have created a new Action Map with the action SpawnAPrefab. This action listens for the Enter key to be pressed and will call our method.
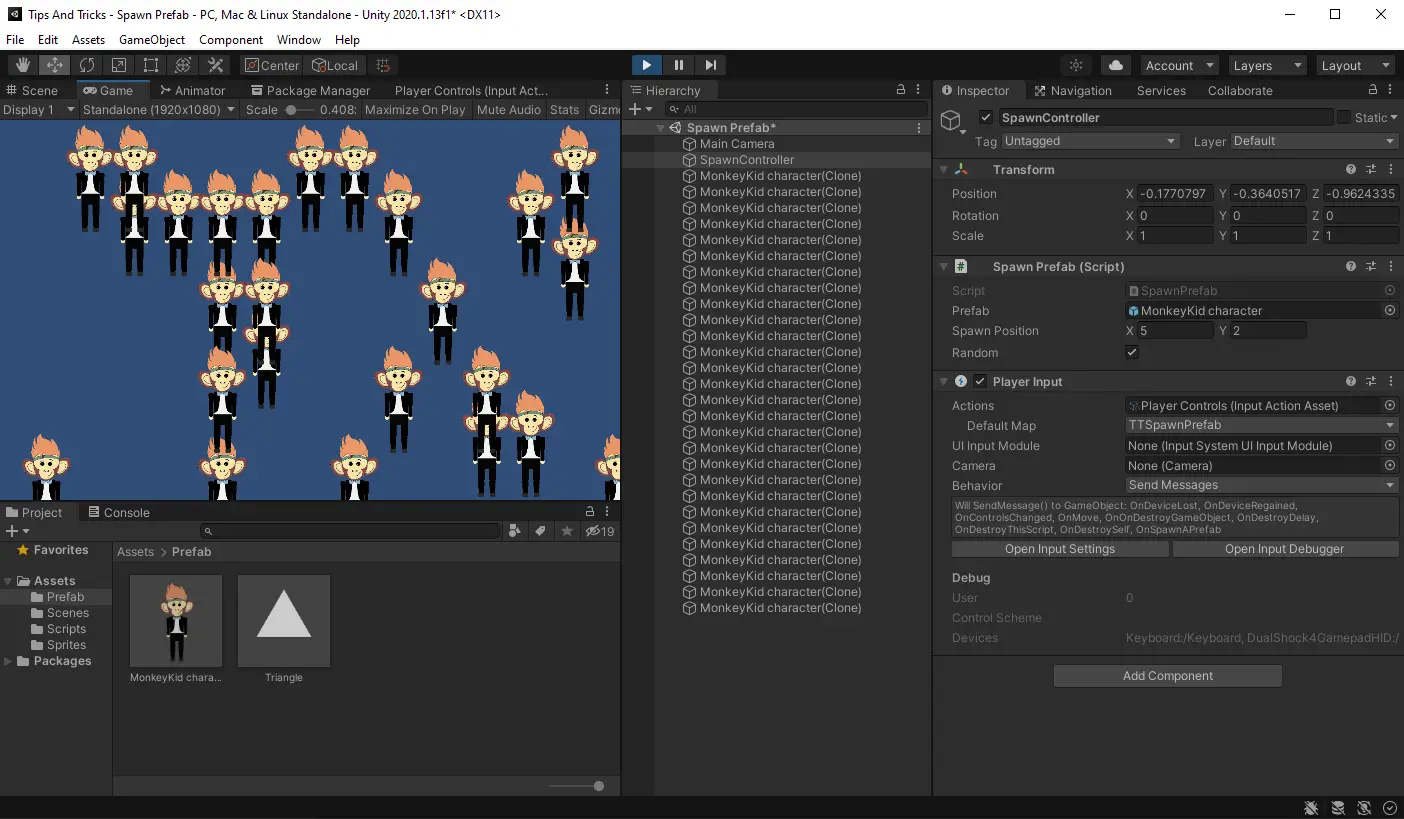
For our prefab object, we have set up a GameObject with our MonkeyKid character sprite. Also, to control our objects after they are spawned, we have attached our Character Movement script and a Player Input component. To learn more about setting up the Character Controller and player inputs check out our article on setting up Unity’s new input system.

Lastly, to round out our scene set up, we have created a SpawnController from an empty GameObject and attached our Spawn Prefab script and Player Input component. This will listen to our inputs and trigger the SpawnAPrefab method.
Spawn Object at a Position
Now, let us specify the position values in our Spawn Prefab script. Set the X Spawn Position value to 5 and the Y Spawn Position value to 2. Remember to drag in a reference to your prefab object into the Prefab field. Now hit play in the Unity editor and you will see the screen start up with the default blue camera background. Press Enter to spawn your first prefab. You can now move the prefab around since it was created with an attached Character Movement script.
Spawn another object by pressing Enter and now you can control multiple prefabs at once. Hit enter as many times as you want while moving the characters around and you will see that the new prefab will always spawn at the specified position.

Spawn Object at a Random Position
Furthermore, we can spawn these objects at random positions by selecting the Random checkbox. Remember that this will cause our if statement to use the randomized X and Y positions, but they will always spawn within the boundaries of the camera.
Continue to press Enter. The objects will now spawn at random positions throughout the scene. These can also be moved around because of the Character Movement script.
You can also spawn prefabs like weapons, items, or power ups that are attached to your player when instantiated. To learn how, check out our article on Instantiating Prefabs as a Child of GameObject.
You are now all set to use Unity to spawn a prefab in your own games. Feel free to use this code in your own projects. Thank you for stopping by. Stick around and check out more of our tutorials or posts like our piece on using Unity’s physics system to add force to GameObjects. Also, leave a comment telling us what you liked or did not like about the tutorial. Was it easy to follow along? What do you want to learn next? As always check out some of our published apps below.