

Tips and Tricks: Unity RigidBody AddForce
Introduction
Unity Rigidbody AddForce is the recommended way to move GameObjects around the game world using physics. To use it properly you will need to have an understanding of what it is, how it works, and how to use it. AddForce is part of Unity’s physics system and is affected by other parts of the physics system including Mass, Drag, and Gravity. In this Tips and Tricks, we are going to demonstrate how all of these factors come into play and how you can start using Rigidbody.AddForce inside of your Unity Games.
What is Rigidbody AddForce
To understand what AddForce does, there is no better place to start than the Unity Documentation on Rigidbody.Addforce. Simply described, Unity states that AddForce “Adds a force to the Rigidbody”. This force is then used to move the GameObject. This is great for firing projectiles, launching vehicles, pushing away objects in an explosion, or moving characters. In short, AddForce adds velocity to your GameObjects.
AddForce vs Velocity
Conversely, we could just add velocity by stating Rigidbody.velocity = newVelocity. So, why even have AddForce? The difference between Rigidbody.AddForce and Rigidbody.velocity is how Unity performs the calculations for applying the physics. AddForce takes into account the GameObjects mass when simulating the physics of adding the velocity.
For example, imagine you are working on a game where you are shooting objects and need the objects to respond to the impact of the projectiles or explosions. If you add velocity to everything impacted by the projectile or shockwave, then a pebble will respond the same way a bus will and that would appear strange to the player. Now, if you use AddForce instead, then when the velocity is applied to the pebble it will move much further than something the size/weight of the bus.
How does Rigidbody.AddForce work?
Additionally, the Rigidbody component is what allows physics simulations to be run against your GameObjects. There are a few properties of rigidbodies that will affect the velocity of the GameObject one added. These are things like mass, drag, and gravity. These are constantly acting on the physical values of your objects without ever implementing any additional code or scripts. You can manipulate these values in the inspector.
If you use AddForce to apply an upward force on an object with a high gravity and mass, it will not move very far without applying a large amount of force. Similarly, if you are wanting to have an object launch forward, like an arrow fired from a bow, but maintain a high velocity then you can either again add more force or reduce the amount of drag. All of these are factors you must consider when designing your game.
How to Use Rigidbody.AddForce
Furthermore, the AddForce method accepts two parameters. The First being the force vector you wish to apply. Unity will apply this force continually towards the coordinates you supplied. Similarly, to adding velocity directly, the speed is determined by the coordinates in the given Vector. If a Vector3 of (10, 5, 0) is supplied, the object will move in a line through coordinates X 10, Y 5, Z0 and a speed of 10 X units and 5 Y units per second.
Second, is the mode at which you want the force applied to the object. The options are Force, Acceleration, Impulse, and VelocityChange. Force applies a constant force to the GameObject while considering its mass. Acceleration does the same as force but ignores the mass. Impulse applies all of the force at once, such as taking the shock from an explosion, while taking mass into consideration. Lastly, Velocity change does the same as impulse but again ignores the mass. The type of ForceMode you wish to apply all depends on the situation you want to use it for.
Since Unity Rigidbody AddForce is a physics simulation we will need to run any of our AddForce code inside of our FixedUpdate method, which is a Unity Lifecycle method. For more on Unity’s Lifecycle check out our article on FixedUpdate vs Update vs LateUpdate. FixedUpdate happens at regular set intervals that are independent of frame rate meaning when our updates happen things will not look choppy just because there was a change to our frame rate.
Rigidbody.AddForce Example
Now, let us set up a simple scene and script to experiment with Unity Rigidbody AddForce. You can create your own scene as you follow along or feel free to clone the repo for this Unity tutorial from our GitHub.
Rigidbody AddForce Script
Start by creating fields for a boolean, Rigidbody, Vector3, ForceMode, and a float. All these should be set to private for proper encapsulation and the Vector3, ForceMode, and float should be serialized for access inside the editor.
Inside of our Update method we will check for inputs on the UpArrow and escape key. If the UpArrow is clicked it will set our bool to true. If the escape key is pressed it will trigger a ReturnToCenter method to move our object back to center and remove any velocity that has been added.
Once our game is started and our script’s Start method is triggered, we will initialize our Rigidbody field by using GetComponent. Start is another of Unity’s lifecycle methods.
Lastly, inside of our FixedUpdate method, if our boolean is set to true then we will call AddForce on our Rigidbody using the parameters set in the inspector. Here is our full Rigidbody movement script.
using System.Collections;
using System.Collections.Generic;
using UnityEngine;

public class AddForceController : MonoBehaviour
{
    private bool addTheForce;
    private Rigidbody ourRigidbody;
    [SerializeField]
    private Vector3 ourVector;
    [SerializeField]
    private ForceMode ourForceMode;
    [SerializeField]
    private float thrust;

    void Start()
    {
        ourRigidbody = GetComponent<Rigidbody>();
    }

    // Update is called once per frame
    void Update()
    {
        if(Input.GetKeyDown(KeyCode.Escape))
        {
            ReturnToCenter();
        }
        if(Input.GetKeyDown(KeyCode.UpArrow))
        {
            addTheForce = true;
        }
    }
    void FixedUpdate()
    {
        if(addTheForce)
        {
            ourRigidbody.AddForce(ourVector * thrust, ourForceMode);
            addTheForce = false;
        }
    }

    private void ReturnToCenter()
    {
        ourRigidbody.position = ourRigidbody.velocity = Vector3.zero;
    }
}
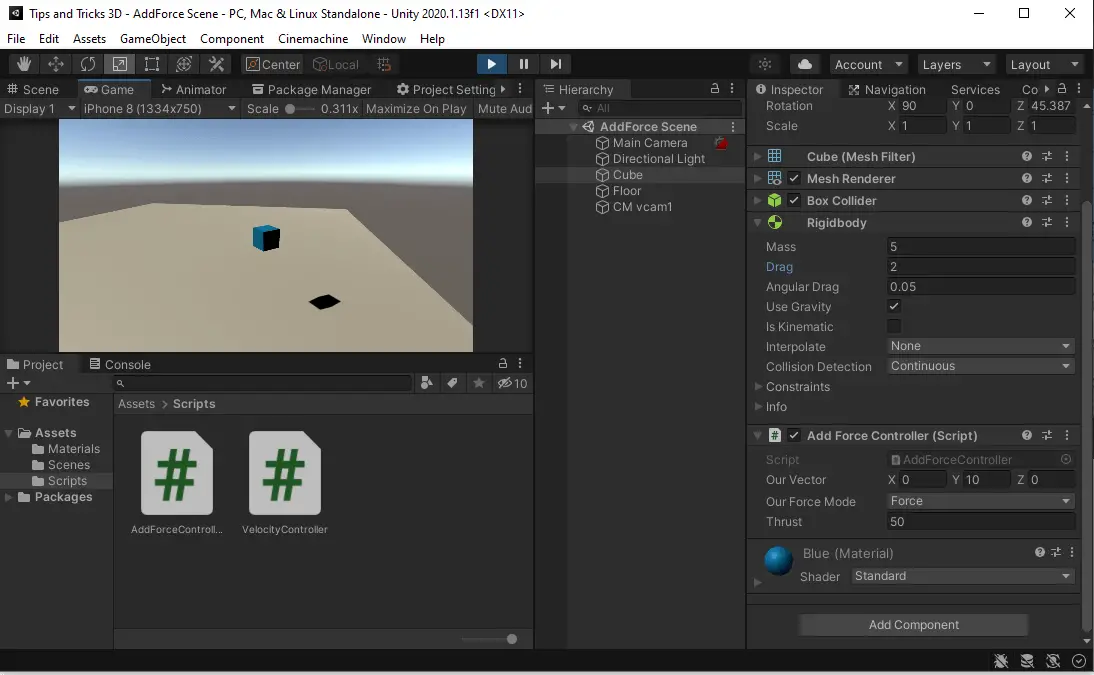
AddForce Scene
For our scene, we have set up a cube with a Box Collider, Rigidbody, and our AddForceController script to run our experiments with. Also, we added a floor, to have something to land on, and a Cinemachine camera set to follow our cube, so we do not lose sight of our cube.
Playing with the Numbers
To start, set the Rigidbody Mass to 5 and the Drag to 2. For our AddForceController set the OurVector X = 0, Y = 10, and Z = 0. Also, set OurForceMode to Force in the dropdown and Thrust to 50.
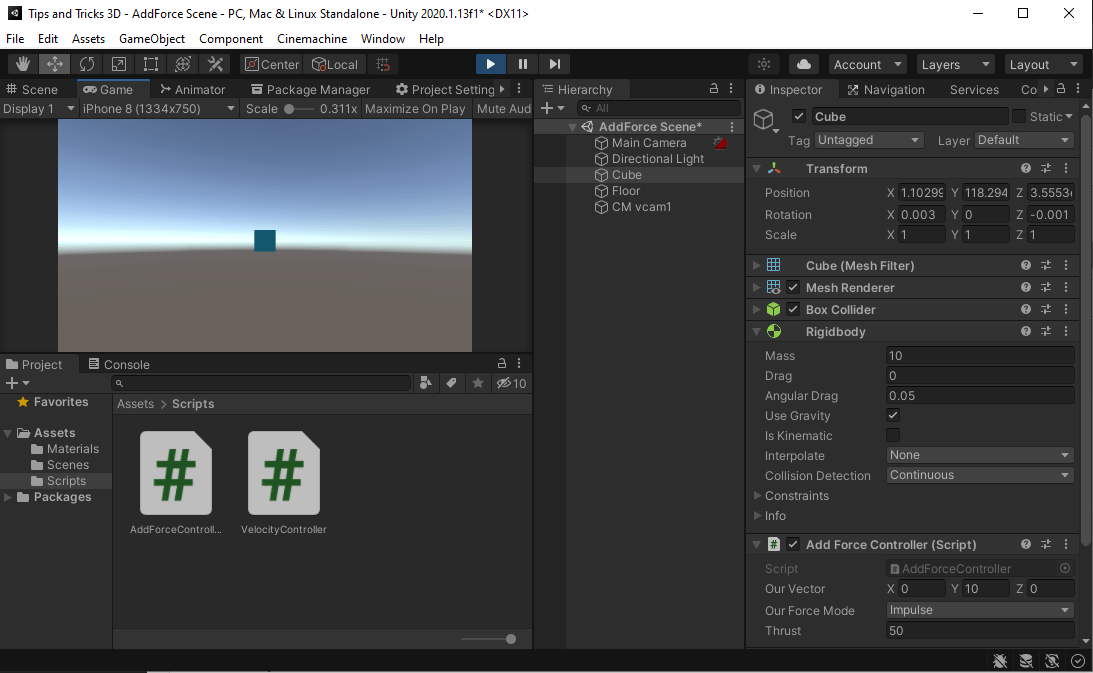
Now, play the scene and tap the UpArrow. Our Cube slowly climbs straight up. Stop pressing the key and our Cube slowly floats down, that is caused by our Drag. Set the Drag to 0 and now the cube will rise and drop much quicker. With ForceMode Force enabled we can see that our Cube moves up about .24 Y units, this is visible in the Cube’s Transform component inside the inspector. Change the force mode to Impulse and press the UpArrow once again. Now our Cube will blast off to a height of 508 Y units.
We can also experiment with the effect Mass has on our Cube. Set the Mass to 10 and ForceMode to Force. Pressing Up will now cause the Cube to barely move. Set the ForceMode to Acceleration and the cube will launch to the same level it would if the Mass were 0, due to it ignoring the Mass property. The same can be seen when switching between Impulse and VelocityChange. Note that you will probably need to use the escape key to return the cube to center when using VelocityChange because it will take much longer to return to the floor.
Wrap Up
Now we have a good understanding of how Unity RigidBody AddForce affects the position of our objects and the impact of ForceMode on our velocity. Now, you can continue to experiment with the X, Y and Z coordinates to see what type of angles and movement you can get out of the simple script. These are values you can take and apply to all sorts of objects in your own game.
And now you are ready to start using Rigidbody.Addforce in the games you create in Unity. Thank you for stopping by. Stick around and check out more of our tutorials or posts like our piece on Tips and Tricks: Unity Rigidbody Velocity. Also, leave a comment telling us what you liked or did not like about the tutorial. Was it easy to follow along? What do you want to learn next? As always check out some of our published apps below.