
Tips and Tricks: Unity 2D PSD Importer
Introduction
Creating game art or assets is a pivotal part of the game development process. The art direction of the game directly influences the player’s sense of power, immersion in the game world, and emotions. Great game art will pull new players in while bad game art will stop players from giving your game a chance. Producing game art, however, takes a lot of time. That is where having a solid workflow can help speed up the process. For instance, using Unity’s 2D PSD Importer to import photoshop files will allow you to quickly move from creation to implementation.
Unity’s 2D PSD importer is easily overlooked because it is offered as a package. To use the 2D PSD Importer, you must download and install the PSD Importer package, set up your game art in layers, save the file as a PSD or PSB file, and then import the asset into Unity. In this Tips and Tricks: Unity PSD Importer we are going to show you how to take your game art from Photoshop directly into Unity with as few steps as possible.
Creating Game Art in Photoshop
The first thing you are going to need is game art. Unfortunately, we cannot show you how to make game art that fits your game. We do have a few tips to help you along the way. The first is to pick a consistent size for your artwork. You do not want to be creating furniture that fills a 3840 pixel by 2160 pixel canvas and then create a character sprite that is 256 pixels by 1024 pixels. This will result in a lot of extra work resizing everything or recreating blurry assets. Unity has a great article on selecting the perfect resolution for 2D assets.
Second, art is an iterative process. Do not expect to have the game’s style nailed down the first go round. Expect to come back to your art several times throughout the development process. If you find yourself getting stuck or frustrated with your art, put it down and pick up some other aspect of your game to work on.
Third, and goes along with the second tip, do not put off creating game art because it is not your strongest skill. If you are not an experienced game artist, you will need time to develop those skills and your game’s art style. Deciding to create art after you work through all the programming aspects of your game, using placeholders or not, will result in you hitting a wall and can lead to an unfinished project. Give yourself time to iterate. Create something small even if it is an initial sketch or outline of a character, then come back after working through other aspects of your game. Rinse and repeat and eventually the small improvements will build towards better art assets.
How to Create a Sprite Sheet Layout in Photoshop
Once you have your art in Photoshop you have a few layout options available to you. If you have several 2D art assets in one file, you will want to lay them out in a grid. Space everything evenly so that you can separate them inside of Unity later. Feel free to create a new canvas that can hold all of your assets if you have them in separate files or do not have enough room to spread them out. This is often referred to as a sprite sheet. The benefit of using a sprite sheet over individual png or jpeg files is that it is more performant and can cut down on your game’s file size. File size is even more important when creating games for mobile devices.
Additionally, if you have your assets saved in layers like our character below, you do not need to do anything. Unity can handle the layers as separate files when importing the PSD file. Make sure all of you Photoshop layers are labeled so they are easier to identify later on.
Save your photoshop File for Unity
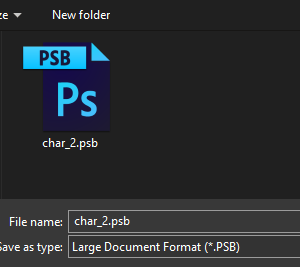
For file types you have a few options. If you have a simple art asset, say a crate, and that is all you want to import, it may be easier to export as a png. Sprite sheets, as described above, can be saved as a PSD or PSB file before being imported. The difference between a PSD and PSB file is that the PSB file carries over more data about the artwork you have designed. The extra data a PSB file carries includes the layers and layer depth information from the art we have created. Art like our example character needs to be saved as a PSB to manipulate the different layers or add things like bones later.
Import Unity’s 2D PSD Importer Package
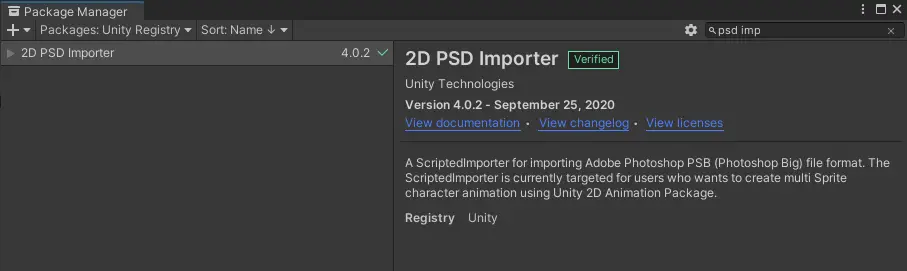
In order for Unity to process your PSD or PSB files you will need to install the 2D PSD Importer package. To do this go to the menu bar inside of Unity and select Window > Package Manager. In the top left, set Packages to Unity Registry. Scroll down or use the search bar to locate 2D PSD Importer. Click install in the bottom right to install the package.
Import Photoshop File into Unity
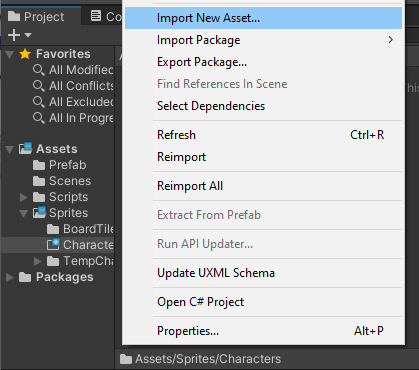
Inside of the project view in Unity, create a folder to hold your assets. Remember, it is way easier to set up an organized project structure now than it is to sort assets later. Do not waste time searching through random files to find what you need. Import your Photoshop art asset into Unity by right clicking in the folder you want to save your asset to and selecting Import New Asset… Select the PSD or PSB file you exported earlier and click ok.
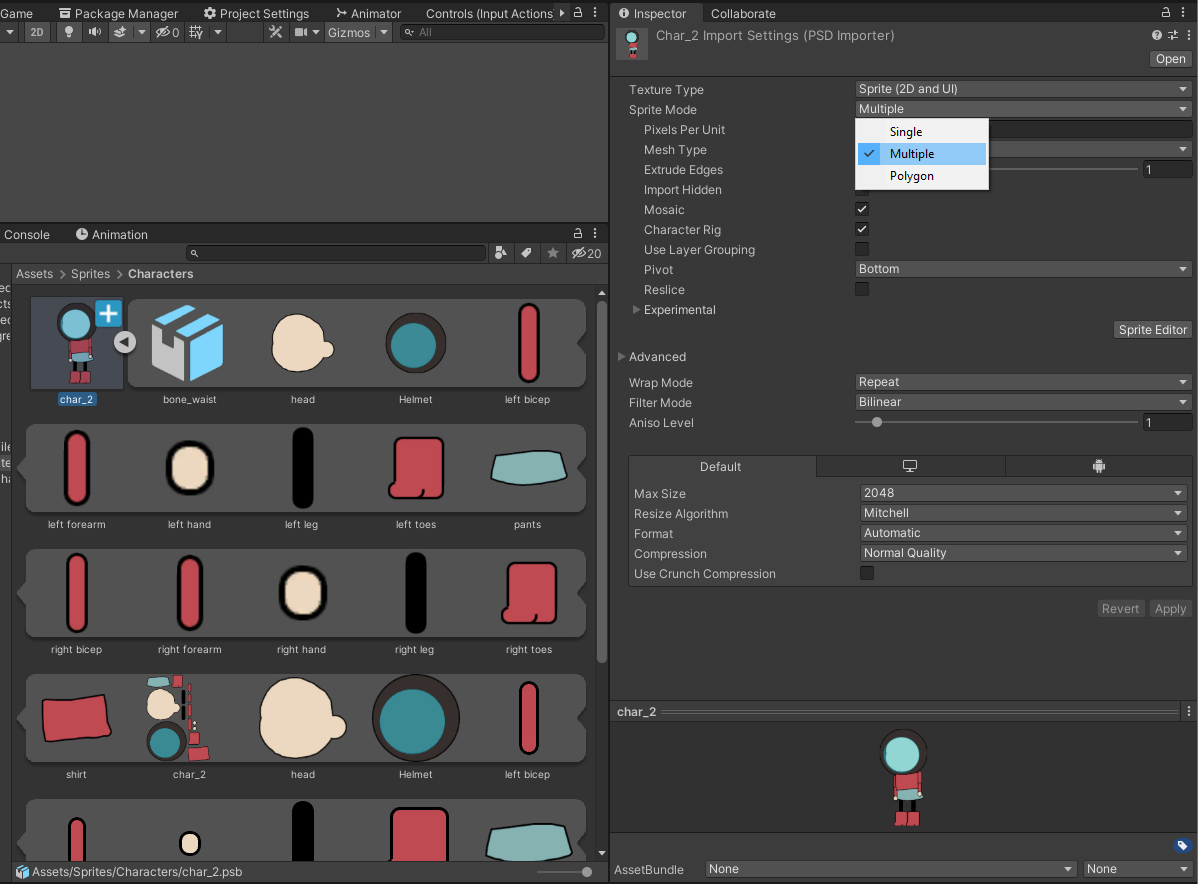
Unity 2D PSD Importer Settings
Now that our file is in the project view, we can select the sprite and edit the properties in the inspector. If you have a sprite sheet or a layered PSB file you will want to change the sprite mode to Multiple. For our PSB file, we can see an arrow next to the asset. Click the arrow to see all of the sprites that make up the asset. Unity has automatically created a prefab out of the photoshop file. If you drag it into the scene now it should appear exactly as you had it saved in Photoshop. The new hierarchy of Game Objects representing the layers from Photoshop. This is great for layered sprites, like the character we showed earlier, since we can quickly add it to the game without having to line up our layers again.
Editing Photoshop Sprites in Unity Using Sprite Editor
Occasionally, you may have issues with the way Unity has separated your sprites in your sprite sheet. You can edit the way Unity has segmented these by selecting the Sprite Editor button from the inspector with the asset selected. Resize the rectangle bounds to slice the sprites into different segments. Move the circle in the center to change the pivot point of the sprite.
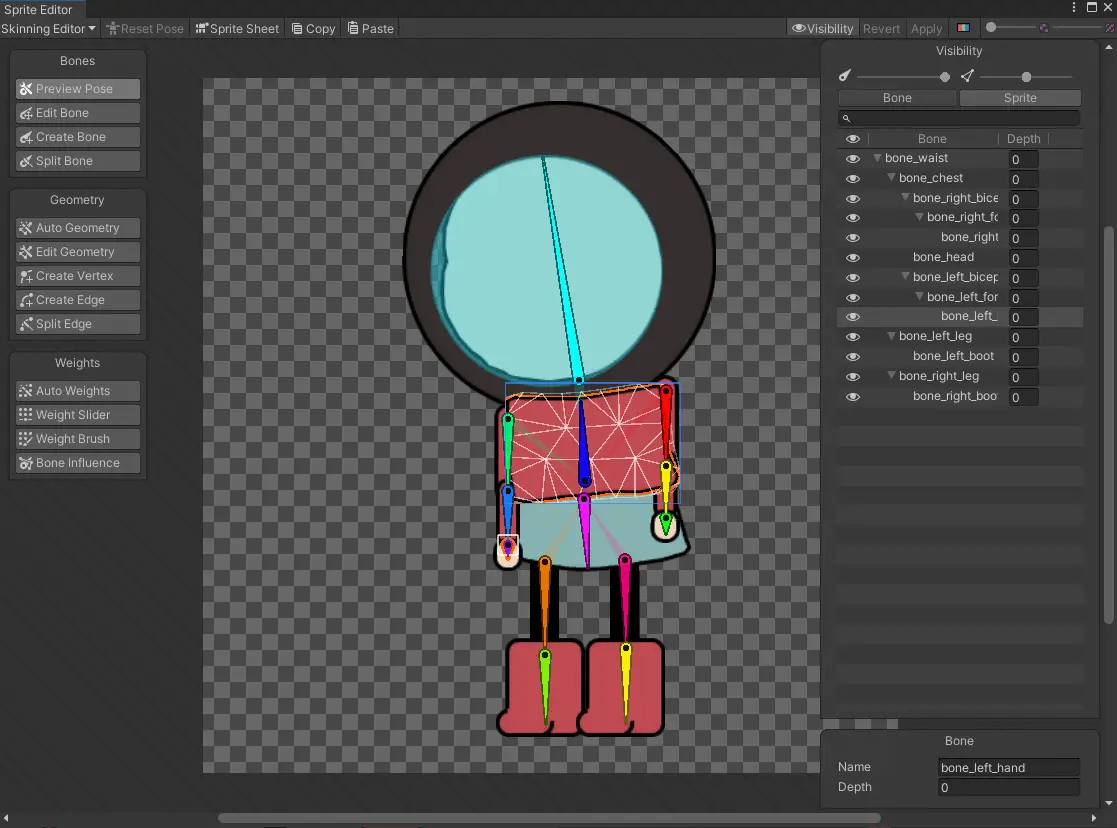
Adding Bones to Photoshop Sprites Using Unity’s Skinning Editor
Additionally, you can add bones to your sprites by using the Skinning Editor. To locate the skinning editor, select your art asset in the project view. Then select the sprite editor button in the inspector. The upper left corner has a drop down containing several editors. Open the drop down and select the skinning editor. Now, you can edit or create bones for the different parts that make up the sprite.
And now you are ready to use Unity’s PSD Importer to import PSD and PSB files from Photoshop to use in your games created with Unity. Thank you for stopping by. Stick around and check out more of our tutorials or posts like our piece on how to pass parameters with ScriptableObject Events. Also, leave a comment telling us what you liked or did not like about the tutorial. Was it easy to follow along? What do you want to learn next? As always check out some of our published apps below.