

Tips and Tricks: Using Unity AddComponent to Modify the Properties of Objects in Your Game
Introduction
Unity’s AddComponent method is extremely useful in scenarios where building a prefab is not possible. AddComponent adds custom classes or any of Unity’s provided components to your GameObjects while the game is running. There are a few ways to accomplish this with code using different syntax.
Unity used to allow you to call AddComponent by using the class name as a string. That is now deprecated, and you must use the class type. It is not much different to use but it is much safer as it is type safe. This means that when you specify a Rigidbody component Unity will guarantee that it will be a Rigidbody and not something else. In this Tips and Tricks: Unity AddComponent we are going to show you how to use this method. As well as cover the do’s and don’ts for writing performant code.
What is a Component in Unity
Components in Unity make up behaviors. These behaviors can be things like a character walking, the system that manages sounds, or the properties of a weapon. Components are the building blocks of Unity. A few of the most commonly used behaviors are included in Unity by default. These behaviors do things like simulate physics (Rigidbody), detect collisions with other objects (Colliders), or control sounds and music (Audio Source).
You almost certainly need to add custom behaviors as well. When you do you will create scripts that extend the class MonoBehavior. This causes your custom behavior to inherit the base class’s ability to add your behavior as a component. The name you give your custom behavior or class becomes the Type.
C# Typecasting
Typecasting is a general property of most programming languages. This allows you to cast one type into another. Much like pouring metal into a mold to form diecast cars, we can make one type behave like another. However, not all objects can be cast into another. It would be difficult to melt down wood to form a tiny car.
    float x = 1.1f;
    int y = (int) x;
In the case of our components, we want to be sure we are getting the expected behavior out of them. You can use parentheses, when casting basic types in Unity, such as making a float an integer (int). The keyword ‘as’ is required for casting components. Typecasting is not required for AddComponent but is a best practice laid out in the Unity documentation.
AddComponent with Typeof
In situations where you are adding a component during gameplay, you will most likely want to modify its properties afterwards. Luckily AddComponent also returns the component it just added so you can store the value. This is more performant than adding the component then having to do a look up by calling GetComponent.
To do this, declare a variable with the type of component you are adding. Name the GameObject you are adding to, in this example we are getting the GameObject our script is attached to. Call AddComponent and pass in the type using the method typeof(). Use type casting to guarantee the type we are setting is correct.
    void DrawALine()
    {
        LineRenderer line = gameObject.AddComponent(typeof(LineRenderer)) as LineRenderer;
    }
If we do not need to modify the component after adding it we can just add the component like so.
    void AddACollider()
    {
        gameObject.AddComponent(typeof(CapsuleCollider));
    }
In this scenario we are not storing the value which means we do not need to cast it using ‘as’.
Add a Component using the Generic Method
We can also save ourselves from typing a few characters by using the generic method. This method uses diamond notation to pass in the type instead of using the typeof() method.
   void DrawALine()
    {
        LineRenderer line = gameObject.AddComponent<LineRenderer>() as LineRenderer;
    }
Notice, LineRenderer is passed inside of the diamonds after AddComponent. Also, we used the typecasting as since we stored the value. Again, to do this without store the value we can exclude the keyword ‘as’.
    void AddACollider()
    {
        gameObject.AddComponent<CapsuleCollider>();
    }
AddComponent Unity Example
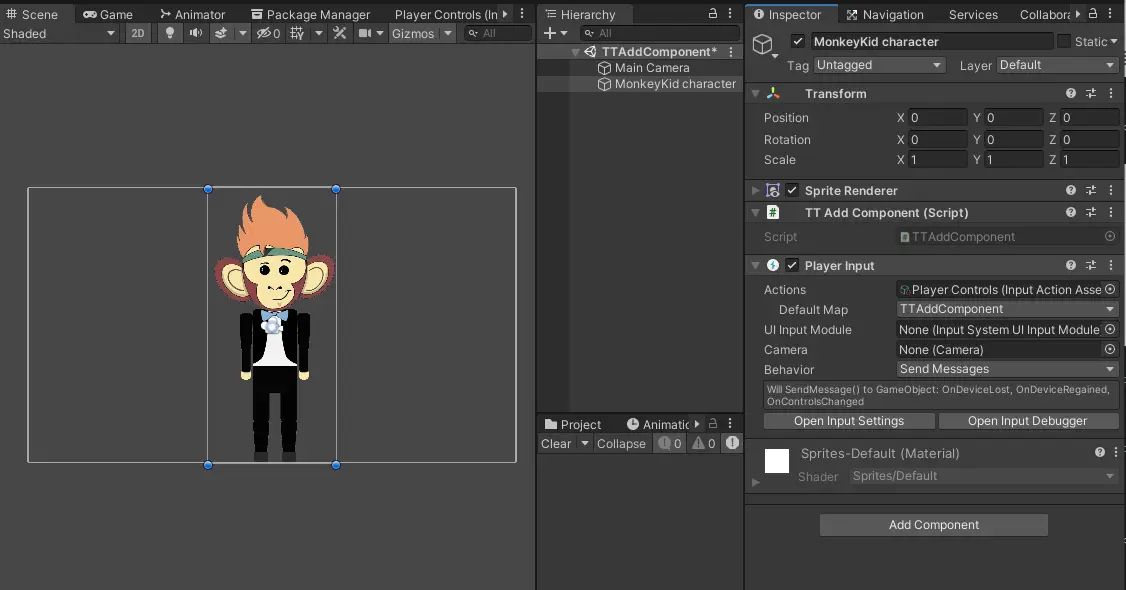
We can demonstrate the changes AddComponent makes inside the Unity editor. Set up a simple scene with a single GameObject. We have also used Unity’s input system to trigger our OnAddComponent method when any key is pressed. Here is what the entire scene looks like.
And here is the full script.
using System.Collections;
using System.Collections.Generic;
using UnityEngine;

public class TTAddComponent : MonoBehaviour
{
    void OnAddCollider()
    {
        gameObject.AddComponent<CapsuleCollider2D>();
    }
}
Now, press play in the editor, to start the game. Select the GameObject you attached the script to. This will open its properties in the inspector so you can see the change happen. Press any key and the CapsuleCollider2D will be added to our GameObject.
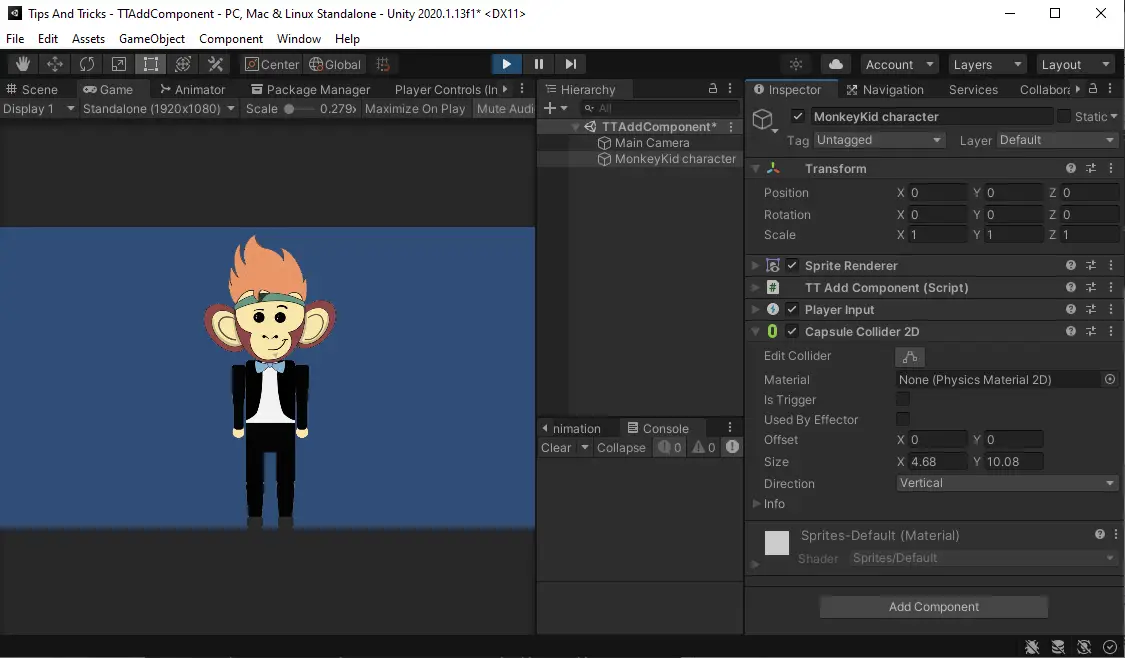
Warning, this approach will continue to add the same component as many times as a key is pressed. There is a way to fix it if this is something you want to use in your projects. Before adding the component, we can check to see if the component already exists. Update your code to the following and the component will only be added one time.
    void OnAddCollider()
    {
        if(gameObject.GetComponent<CapsuleCollider2D>() == null)
        {
            gameObject.AddComponent<CapsuleCollider2D>();
        }
    }
And now you are ready to use AddComponent to modify objects in the games you create with Unity. Thank you for stopping by. Stick around and check out more of our tutorials or posts like our piece on developing games faster with keyboard shortcuts in Unity. Also, leave a comment telling us what you liked or did not like about the tutorial. Was it easy to follow along? What do you want to learn next? As always check out some of our published apps below.