

Creating a Top Down Movement Script for 2D in Unity
Introduction
Movement is likely the first thing you implement when developing a game. It is something you can iterate and build on as your game takes shape. A top down movement script may seem like a simple task but when you are building your game from scratch things can get complicated quickly. We are going to show you how to implement top down movement in Unity to help you get your game started right.
Player movement is a vital part of a game’s persona. If the movement is consistent with the player’s expectations then you will not hear a thing about it. If it goes above and beyond it can become part of the game’s narrative and can become a selling point. Beware, if the movement is bad players will likely return or avoid your game all together.
In this tutorial we are going to show you how to implement input controls, top down movement, and rotate the player’s sprite so that it faces the direction they are moving.
Define the Requirements for Top Down Movement
First, we need to define the range of movement the player can have. Can they move up and down? Left and right? Are they allowed to move diagonally? These are important because we need to make sure our game environment allows for the movement. If we have an endless runner type of game, we do not want the player to move up and down, just side to side. Games like Frogger or Crossy Road add to the challenge by removing diagonal movements.
We are going to allow for all movement directions here, but we can easily modify the code to limit player movements.
Rotation also plays an important role in movement. Games that have a straight down camera will not have to worry about creating different sprites for the many angles a character can move in. Games that have a slight angle to the camera will have to decide if they want the character to animate in each angle of movement. Some games may choose to only have sprites for the horizontal and vertical access. Others, like Among Us, will only flip the sprite left and right to face the horizontal direction of movement, even if the player is traveling up or down.
Once again, we will be coding for freedom of rotation. This will allow you to add limitations to the code based on your needs. We are also using a ship sprite from our Brackey’s game jam entry to demonstrate the movement. This ship looks great while moving in all angles.
Pick an Input System
Importantly, the input system you decide to use in Unity will dictate the amount of setup and type of logic you will need to deal with player input. We are using the new input system as it we find it way easier to get working and modify later if needed. We will show you the basic setup for this script but if you want more details check out our article on Unity’s input system and multiplayer controls.
Create the Top Down Movement Script
To start our movement script, we will create a project folder in Unity named Scripts to hold all of our script files. Inside of the Scripts folder we will create a new C# script named CharacterMovement. Feel free to call the script whatever makes sense to you.
Inside of the script, create three private fields to hold our data. A float named movementSpeed for controlling our player’s speed. A Vector2 named movement for storing our input movement. Lastly, a Rigidbody2D named rbody for keeping a reference to our characters rigidbody.
We will need our rigidbody stored before any input can be triggered. For this we will use Unity’s life-cycle Awake method. Cache a reference by using the GetComponent method and storing it in rbody.
using System.Collections.Generic;
using UnityEngine;
using UnityEngine.InputSystem;

public class CharacterMovement : MonoBehaviour
{

    [SerializeField]
    private float movementSpeed;
    private Vector2 movement;
    private Rigidbody2D rbody;

    private void Awake()
    {
        rbody = GetComponent<Rigidbody2D>();
    }

}
Creating Inputs
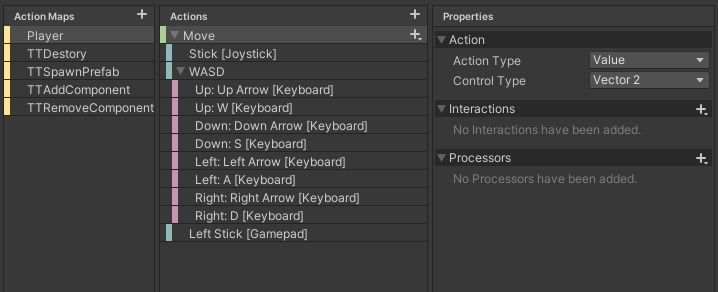
Create an input action asset to hold our desired inputs. For more info on input actions check out our article on Unity’s Input System. In the input action asset, create a Player action map. With the player map selected, create an action named Move. Defining our action with the name move will cause the inputs to trigger a method named OnMove which we will define in our script.
Click the plus icon next to Move to add specific keys for triggering the action. Here we have added the stick from a joystick, WASD and arrow keys, and the left stick from a controller/gamepad.
With the Move action selected, the properties appear on the right hand side. Set the Action type to Value and the Control type to Vector2. If you were making a 3D game you would want this to be a vector 3.
Inside of our script we can now define the OnMove method. Since we setup our control type to Vector2 we can retrieve that information by allow the parameter InputValue to be passed through and then extracting the Vector2 with .Get<Vector2>()
    void OnMove(InputValue value)
    {
        movement = value.Get<Vector2>();
    }
Moving the 2D Sprite
Next, with our previous set up we can easily move our sprite around the screen. First thing we need to do is get our current position. This can be done by calling rbody.position. Now, we need to multiply our movement by the speed we want to travel. If we do not do this our character will move pretty slow.
Time to put all the pieces together. We take our current position and our speed adjusted movement and multiply it by Time.fixedDeltaTime, to smooth the movement, and store them in a new position variable. We then call rbody.MovePosition and pass in our new position.
    public void Movement()
    {
        Vector2 currentPos = rbody.position;

        Vector2 adjustedMovement = movement * movementSpeed;

        Vector2 newPos = currentPos + adjustedMovement * Time.fixedDeltaTime;

        rbody.MovePosition(newPos);
    }
Before our character can move we need to call our movement method inside of the FixedUpdate() life-cycle method. Our character can now move across the screen in any direction we choose.
    void FixedUpdate()
    {
        Movement();
    }
If we are not inputting any variables the movement will be set to zero. All of our adjustments will then be multiplied by zero, which if you remember all those wonderful years of math class, making all of our end values zero. So, our player automatically stops if we stop.
Rotating the Sprite Towards the Movement Direction
Rotating the sprite is simple but can be very confusing. Using Quaternions in Unity in general can become quite complicated. That being said we rely on Quaternions when we want to rotate our GameObjects. Here we will set the rotation of our character by calling Quaternion.LookRotation. We will then pass in the target to look at as Vector3.back. Vector3 is needed because we will want to rotate on the z axis even though we ignore the z position. With that said we can tell Unity which was is back by passing in our current movement direction.
Because Movement is zero when we are not inputting anything, the sprite will flip back to its original position. To stop this, we will only rotate when movement is not equal to zero.
    public void RotateTowardDirection()
    {
        if(movement != Vector2.zero)
        {
            transform.rotation = Quaternion.LookRotation(Vector3.back,movement);
        }
    }
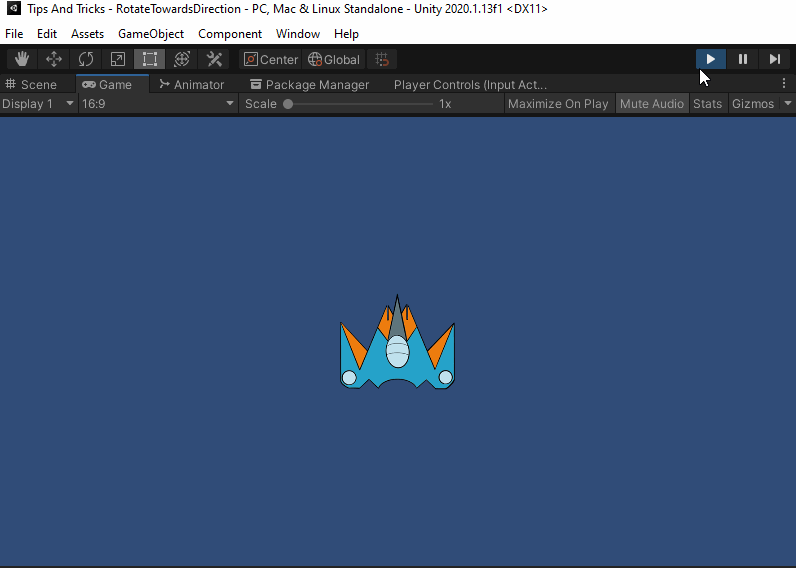
Spaceship Movement and Rotation Example in Unity
At last, it is time to put together everything inside of Unity and see how it works. Create a new scene in your Unity project and drag out the sprite you wish to move and rotate from a top down perspective.
Once that is done attach a Rigidbody2D to the sprite. Make sure your sprite is centered in the camera’s view. If things are looking a bit tight for your sprite to fly around, you can increase the size of the camera or decrease the size of the sprite.
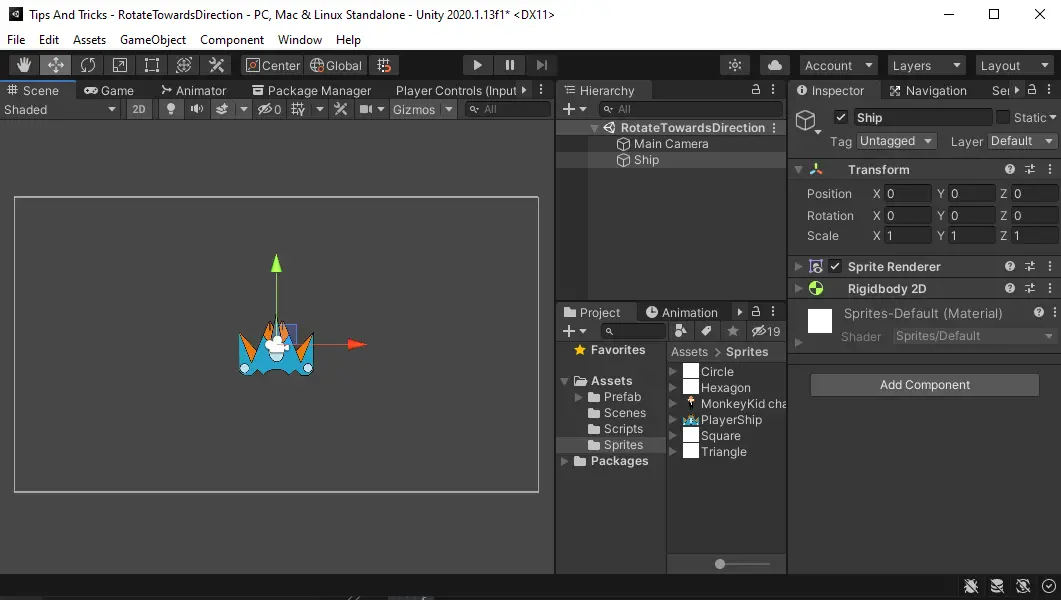
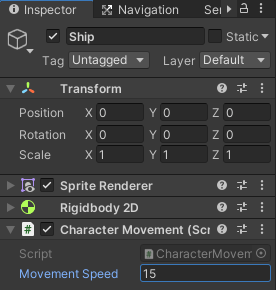
Attach the Movement script you created earlier. Because we made our speed variable a serialized private field, we can adjust the speed in the editor. Start with 15 and increase or decrease the speed as needed based on the game feel you want to have.
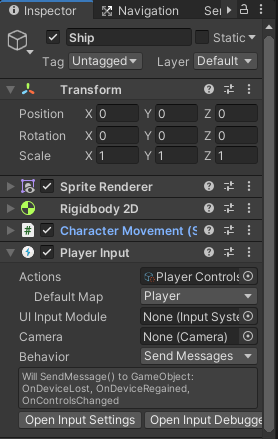
To tell the input system which object we want to control, we will also attach a PlayerInput component to our sprite. Here we can tell it which input actions we want to apply. For our case, we assigned the InputActions asset we created earlier. Then, we set the default map to Player.
With our settings entered open up the game window and hit play. Using our arrow keys, we can now fly around the screen and rotate in the direction we are moving.
Switch to the WASD keys and the movement continues to work the same. Try the same for a gamepad and you will see that everything functions correctly. This is because of the inputs we configured in the input system.
Inspect the player and adjust the movement speed to see how it impacts your gameplay. Feel free to play with the code and see what changes you can make. For example, try to limit the movement to the screen window or clamp the movement to one axis at a time.
You could always implement multiplayer controls or cinemachine follow cameras to give the player greater range of movement and provide an open world feel.
And now you are ready to implement your own top down movement in the games you create with Unity. Thank you for stopping by. Stick around and check out more of our tutorials or posts like our piece on What is a Game Developer’s Salary. Also, leave a comment telling us what you liked or did not like about the tutorial. Was it easy to follow along? What do you want to learn next? As always, check out some of our published apps below.
Never move a rigidbody object like this, it overrides the physics engine and will break the physics system. Use addforce, or dont use rigidbody if you do not want true physics
We are using the rigidbody method MovePosition to move the rigidbody. This does NOT override the physics engine. If we had used rigidbody.position = position then it would override the physics system.
Directly from the Unity documentation
“Moves the rigidbody to the specified position by calculating the appropriate linear velocity required to move the rigidbody to that position during the next physics update. During the move, neither gravity or linear drag will affect the body. This causes the object to rapidly move from the existing position, through the world, to the specified position.
Because this feature allows a rigidbody to be moved rapidly to the specified position through the world, any colliders attached to the rigidbody will react as expected i.e. they will produce collisions and/or triggers. This also means that if the colliders produce a collision then it will affect the rigidbody movement and potentially stop it from reaching the specified position during the next physics update. If the rigidbody is kinematic then any collisions won’t affect the rigidbody itself and will only affect any other dynamic colliders.”
I’ve copied all code in the movement script, however it is not rotating. I have confirmed I have that code in there. I tried posting code here but wordfence blocked me
Can you post the intier script in one im having a hard time figuring out where parts of the script are supposed to go